
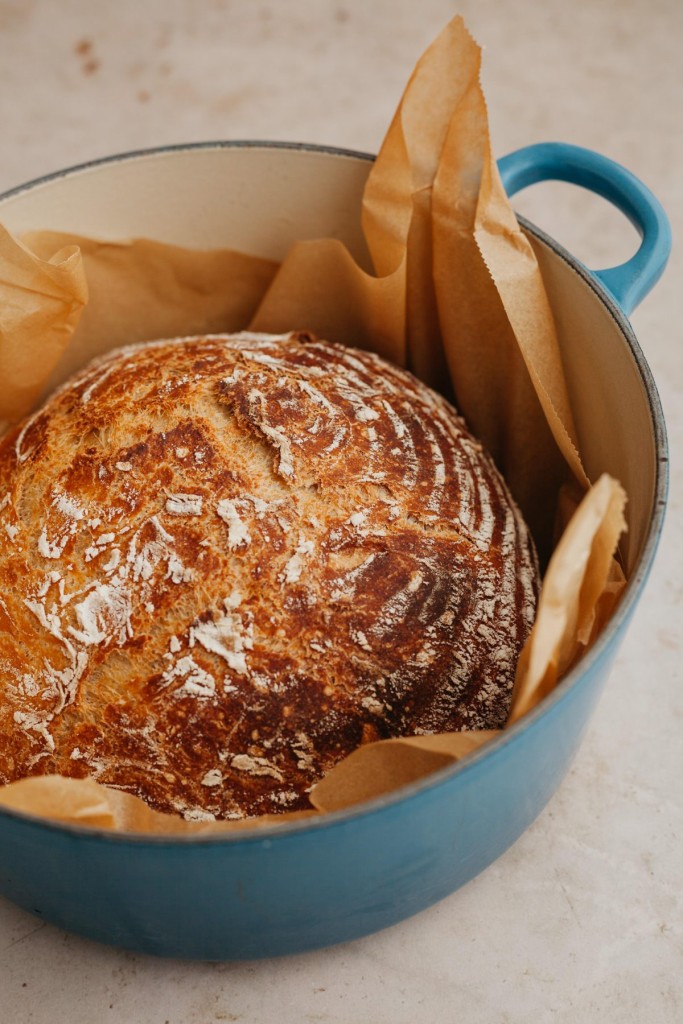
Even beginner bakers will love this easy Overnight Bread Recipe! Make a delicious loaf of bread at home with just 4 simple ingredients and without any complicated methods. The dough proofs overnight giving an extended about of time for the yeast to activate and the dough to develop flavor.
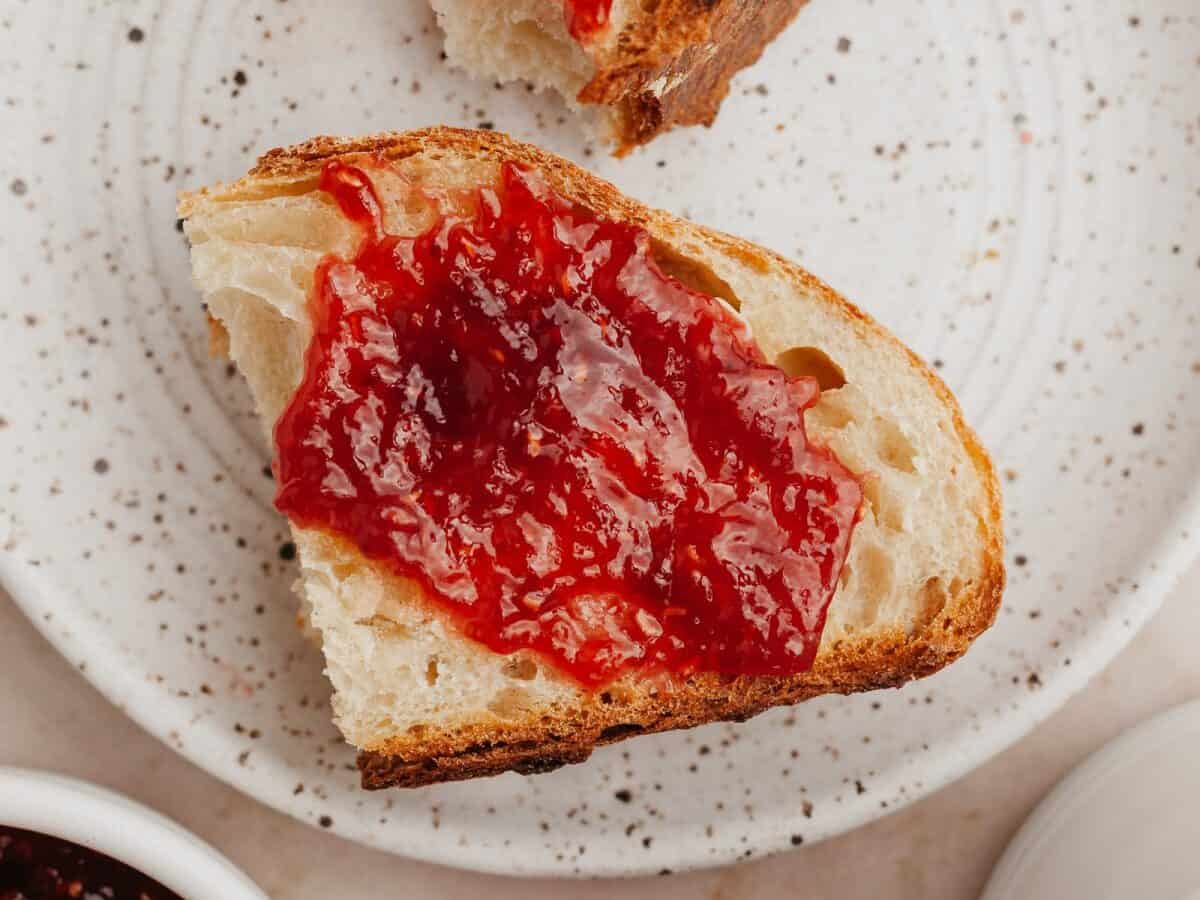
I love to use this bread for breakfast, sandwiches or as a side for soups and salads. Some of my favorite toast toppings include sweet whipped ricotta, whipped cottage cheese, marinated tomatoes, and creamy zhoug sauce.
Homemade Bread
Great for Beginners
Quick Look: Overnight Bread Recipe
- ⏱️ Prep Time: 2 hours
- 🕖 Proof Time: Overnight ~ 12 hours
- 👩🍳 Cook Time: 50 minutes
- 🕖 Total Time: 14 hours and 50 minutes
- 🥖 Servings: 10 slices
- ⚡️ Calories: 181 calories per slice (based on nutrition panel)
- 🔥 Cooking Method: Mix, proof in fridge and bake in oven at 450F
- 🛒 Main Ingredients: all purpose flour, water, salt and yeast
- ⭐️ Difficulty: Medium. This bread recipe takes time and focus, but it is great for beginners.
SUMMARIZE & SAVE THIS CONTENT ON
- Quick Look: Overnight Bread Recipe
- Simplify the bread baking process by letting it proof overnight
- Why use a dutch oven to bake bread?
- Ingredients You’ll Need
- Why do I need to use warm water when baking bread?
- How much yeast do i need for an overnight proof?
- How to make This Overnight Bread Recipe 🥖
- Mad’s Expert Tips for the Best Overnight Bread 🍞
- Storage and reheating
- Recipe
Jessica left this 5 star review ⭐️⭐️⭐️⭐️⭐️
“You guys, this overnight bread recipe is PERFECT. I made for the first time last night and then baked this morning. It was easier than I expected. Bread came out absolutely beautiful and delicious. Will def be making a lot more.”
Simplify the bread baking process by letting it proof overnight
Who doesn’t love waking up to the smell of fresh baking bread! Use this simple overnight bread recipe to prepare dough the night before and bake your loaf in the morning.
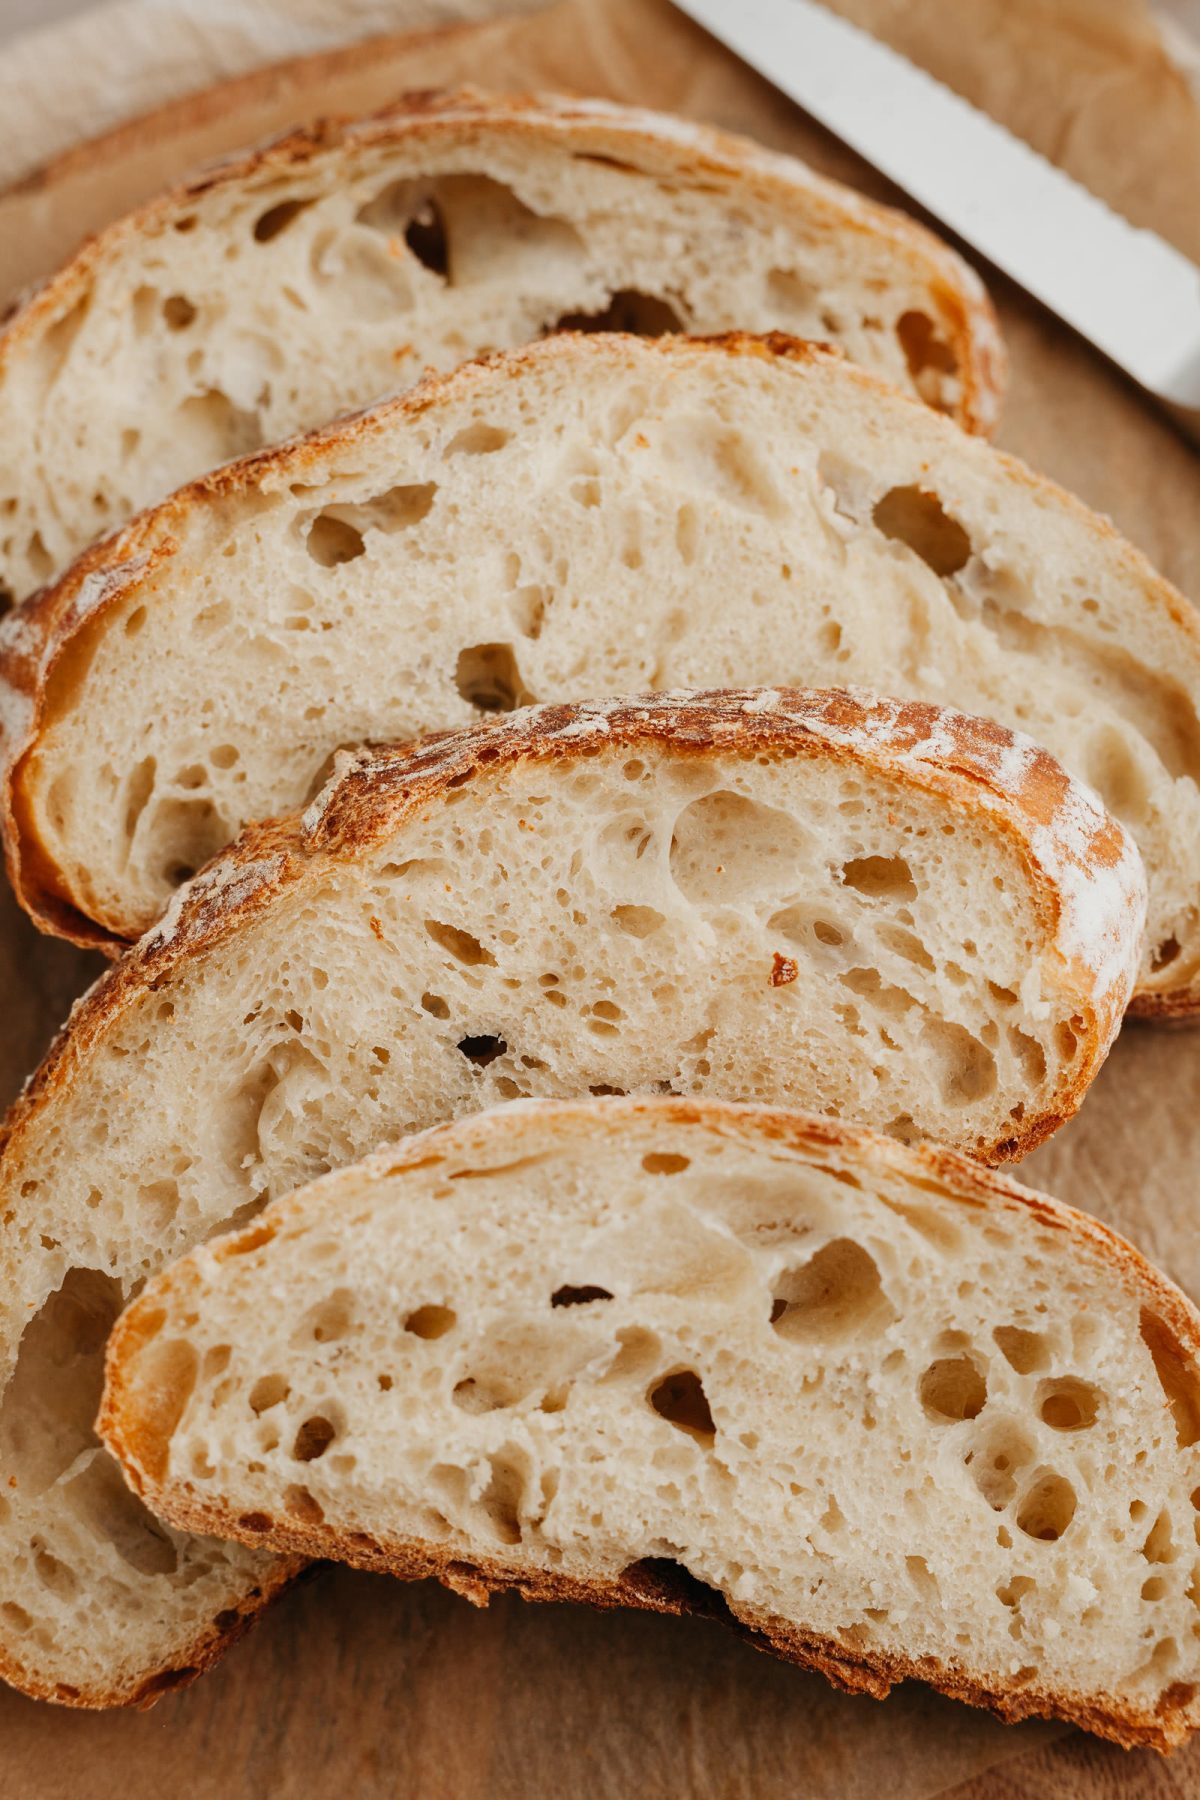
This bread is made with a yeasted dough, but because the dough is able to ferment overnight, you only use a very small amount of yeast. The small amount of yeast and overnight fermentation gives this bread lots of wonderful flavor.
I love to prepare my dough on Sunday night so that Monday morning I can bake a fresh loaf for the week ahead! It is perfect thing for toast with butter and jam, for a sandwich or even to dip into a hearty bowl of soup!
Why use a dutch oven to bake bread?
A dutch oven is the perfect thing to bake an artisan bread loaf without having any special equipment. To create a crisp, thick crust on the bread dough you need concentrated heat in a small area.
If you do not have access to a dutch oven, any other oven safe pot with thick bottom and sides will work, but your crust might not be as crisp.
Preheat a coated cast iron dutch oven in the oven at a high heat while your loaf is going through its final proof. Then, carefully transfer your loaf to inside the dutch oven and bake it with the cover on for a bit. Remove the top of the dutch oven to finish the bake.
Ingredients You’ll Need
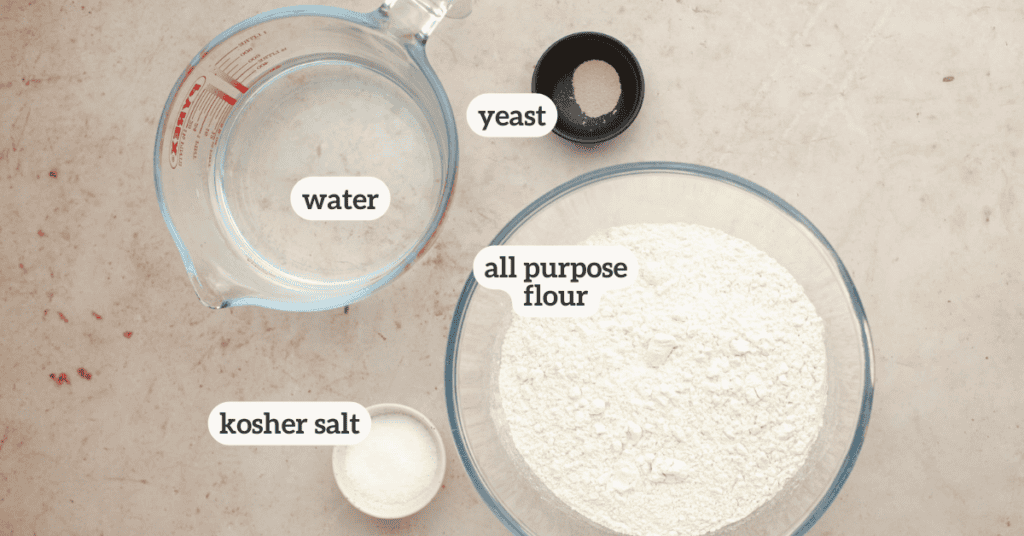
- Bread flour or all purpose flour: I usually use all purpose flour because I always have it on hand for other baking tasks. Bread flour will result in a slightly chewier bread due to the higher protein content. Some people prefer that texture.
- Water: warm water is key for a smooth dough and an activated yeast. I aim for water between 90-95 degrees Fahrenheit.
- Kosher salt: salt is key for adding flavor to the loaf. I prefer to use kosher salt for the perfect level of saltiness. Table salt can be twice as salty as kosher salt so if you want to use table salt I would cut the amount in half.
- Active dry yeast: active dry yeast tends to to rise more slowly which is perfect for this overnight loaf. This recipe only requires a small about of yeast to support the extended rise time.
You can also use instant yeast for this recipe. Instant yeast can be used immediately out of the package whereas active dry yeast needs to be activated. Because we are letting this dough rest overnight, either one of these options will work just fine!
Why do I need to use warm water when baking bread?
When baking bread it is essential to use warm, but not hot water to prepare the dough. Using warm water, between 90-95 degrees F, helps the yeast to properly activate and give the bread the proper rise.
Be careful not to use water that is too hot because you an accidentally kill the yeast resulting in a poor rise.

How much yeast do i need for an overnight proof?
The beauty of leaving dough to proof overnight is that you can use significantly less yeast than a standard recipe and still get a good rise on the loaf. This loaf only requires 1/8 teaspoon active dry yeast.
That is an extremely small amount of yeast in comparison to other yeasted loaves. Because we are doing our bulk fermentation and proofing of the dough overnight, we do not need as much yeast to still get a good rise and lots of air bubbles in the dough.
How to make This Overnight Bread Recipe 🥖
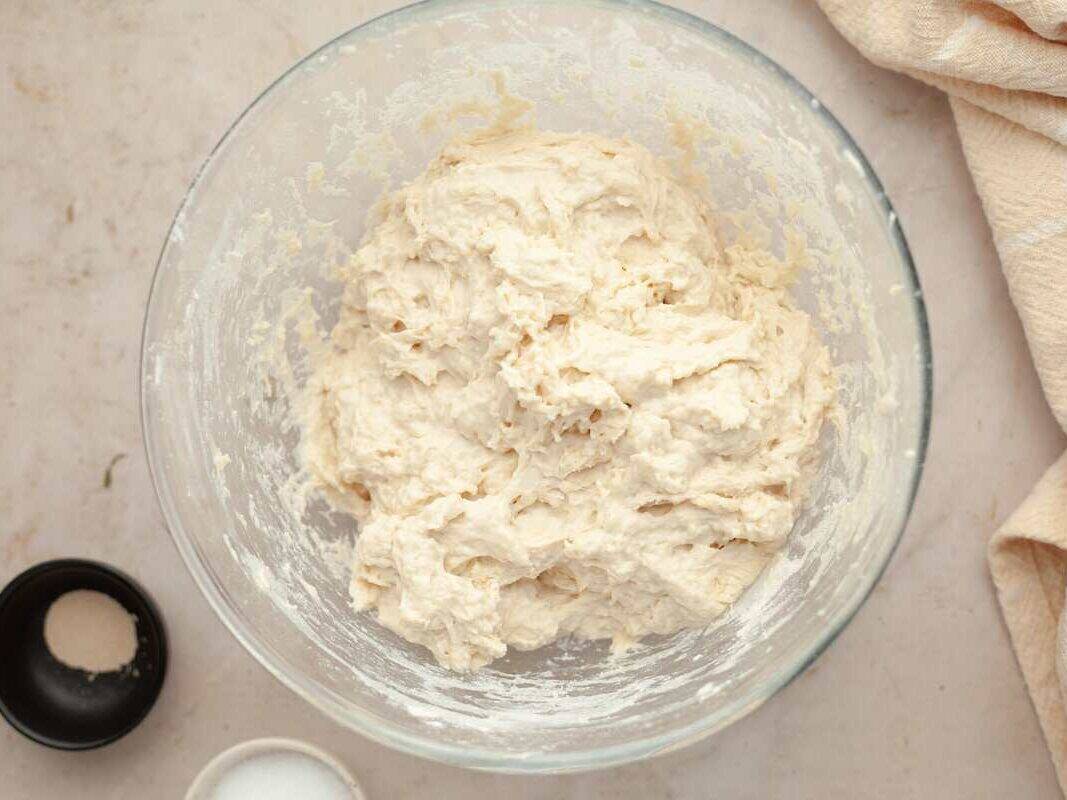
Step 1: Mix flour and warm water in a large mixing bowl with clean hands to create a shaggy dough. Allow this mixture to sit for 20 minutes under a damp towel.
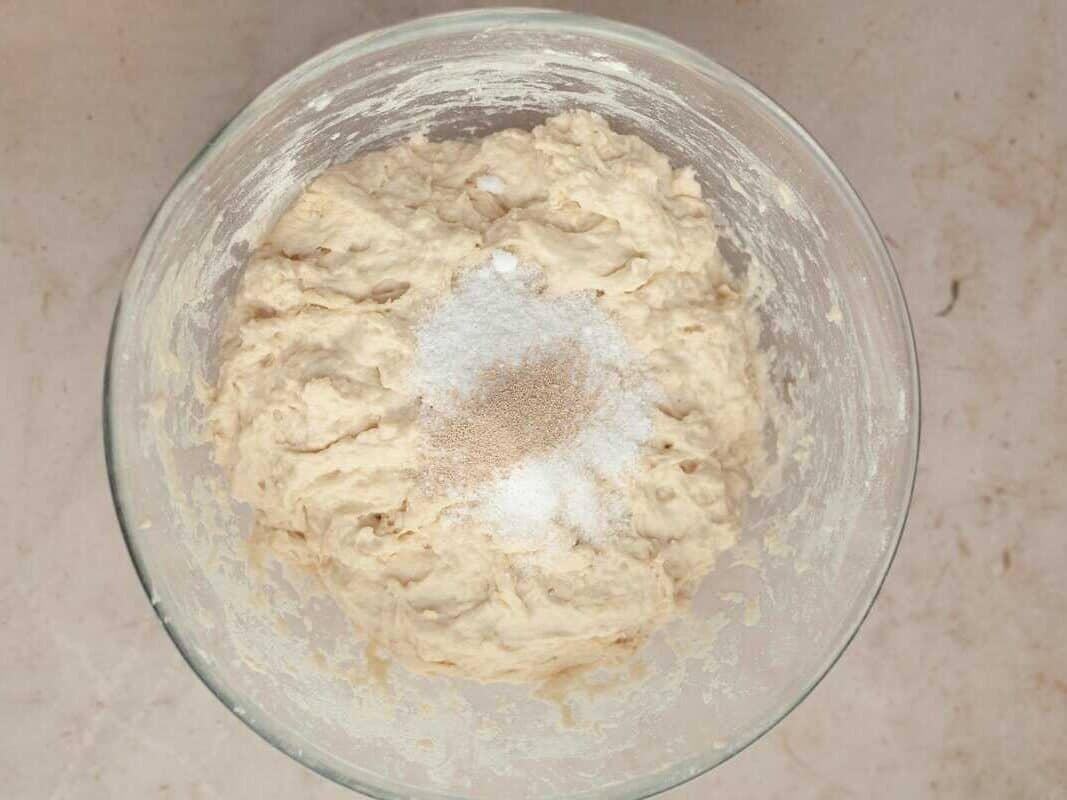
Step 2: Pour kosher salt and yeast into the bowl and mix in with the dough. Use damp hands to fold the salt and yeast into the dough.
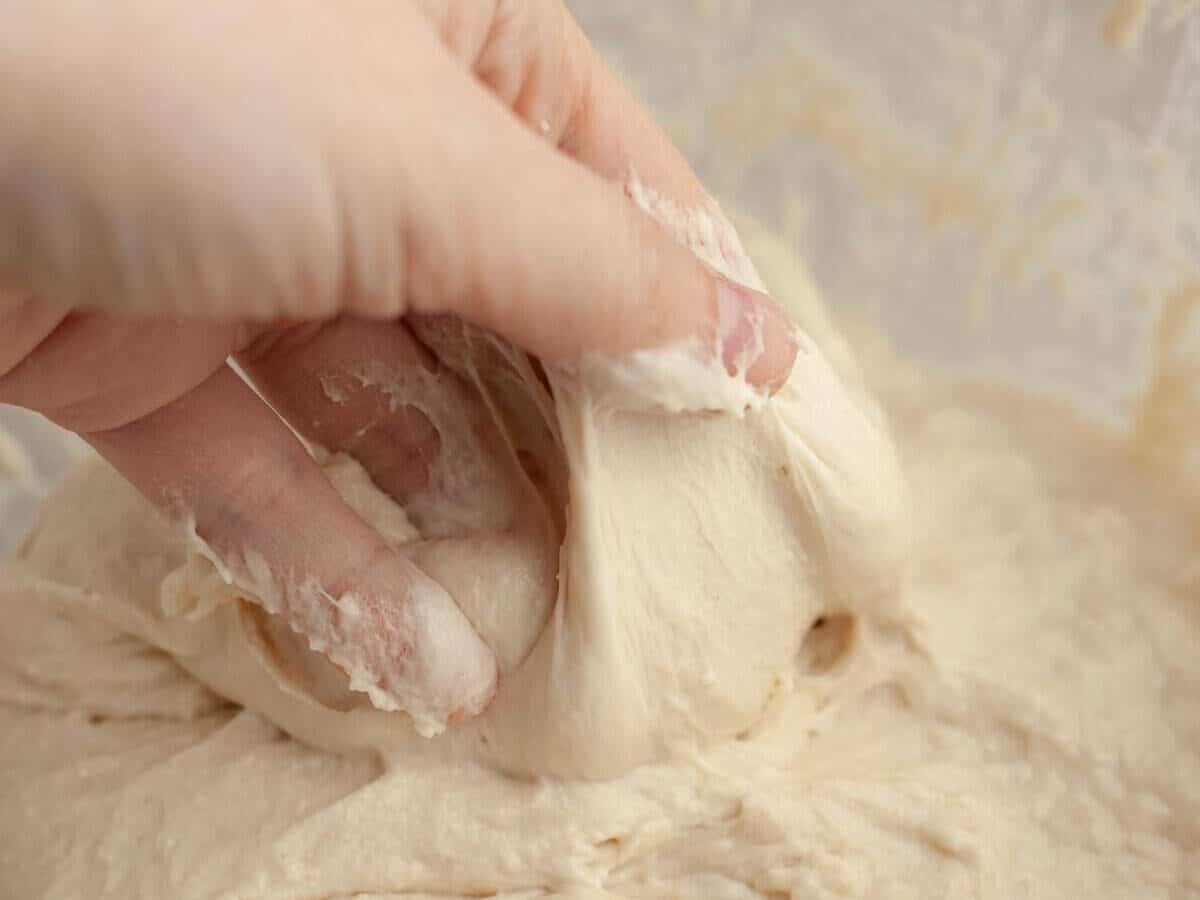
Step 3: Over an hour and a half period, perform stretch and folds of the dough 3 times. Allow the dough to rest for 30 minutes between each fold.
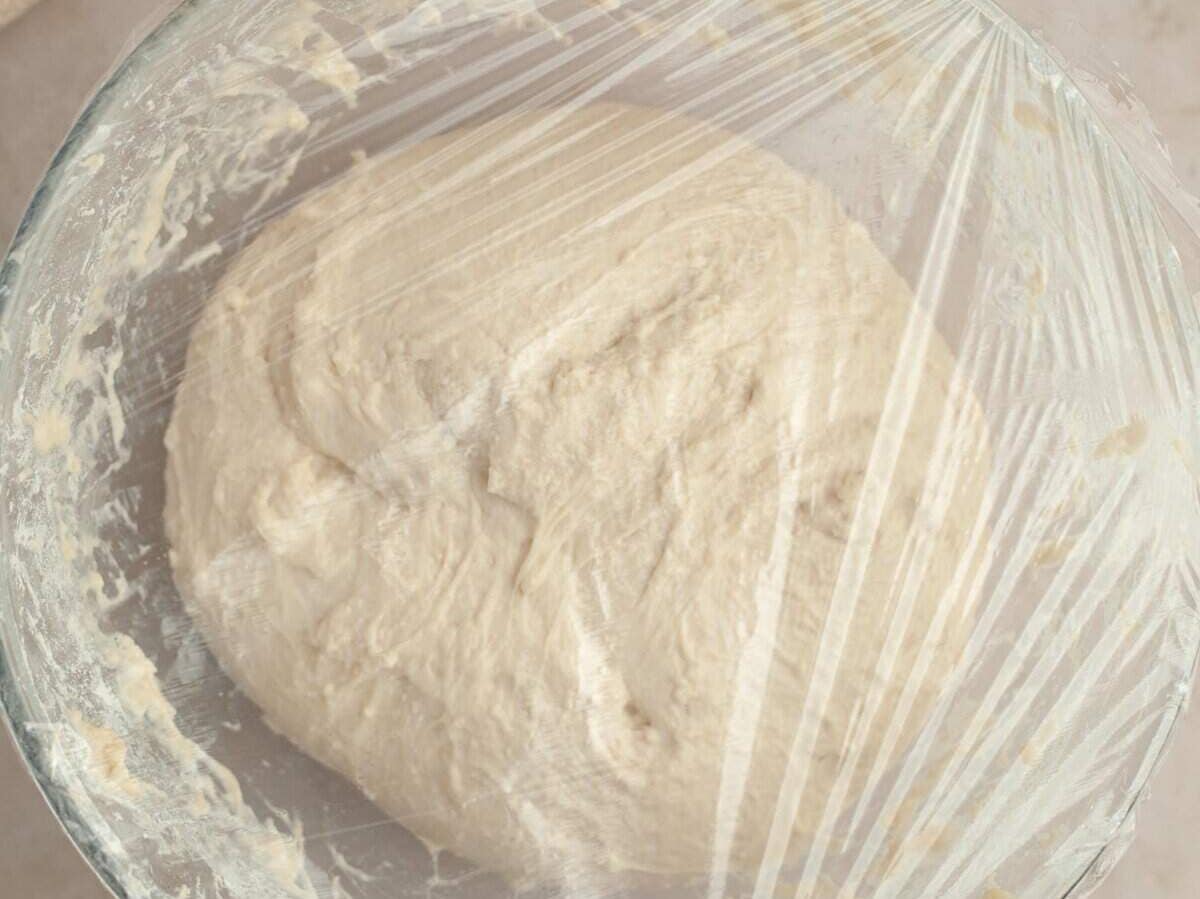
Step 4: After the sets of stretch and folds, cover the bowl in plastic wrap. Place the dough in the fridge for 12 hours – ideally overnight.
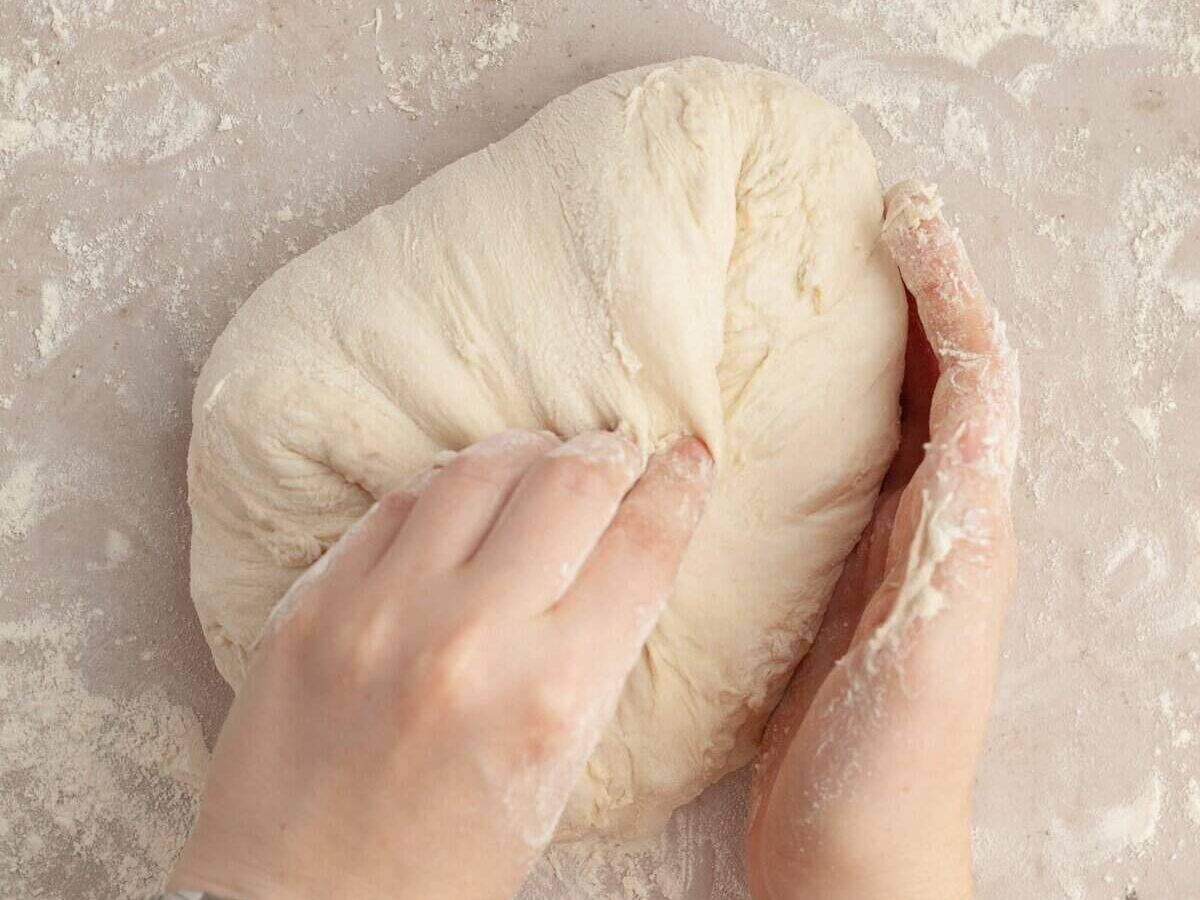
Step 5: The next morning, shape your loaf into a round shape on the a floured surface.
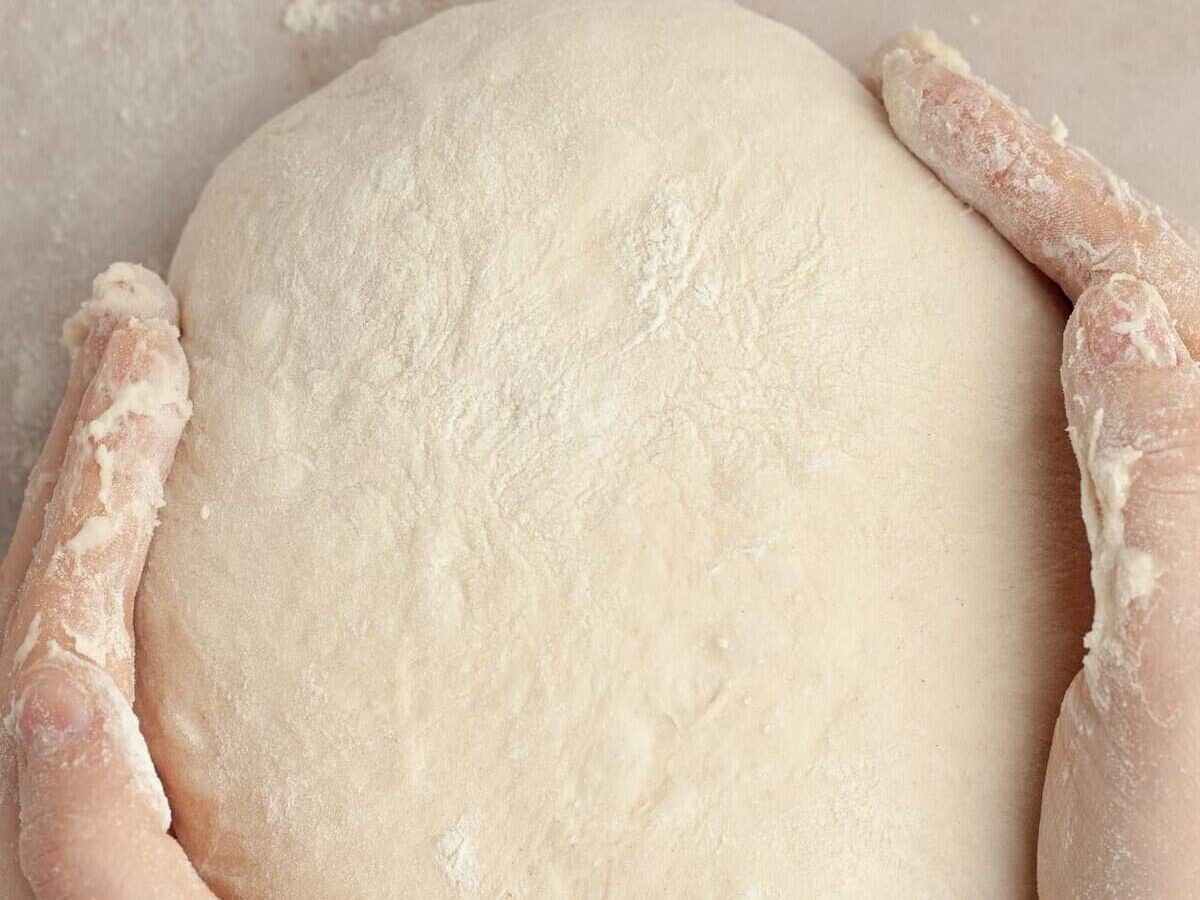
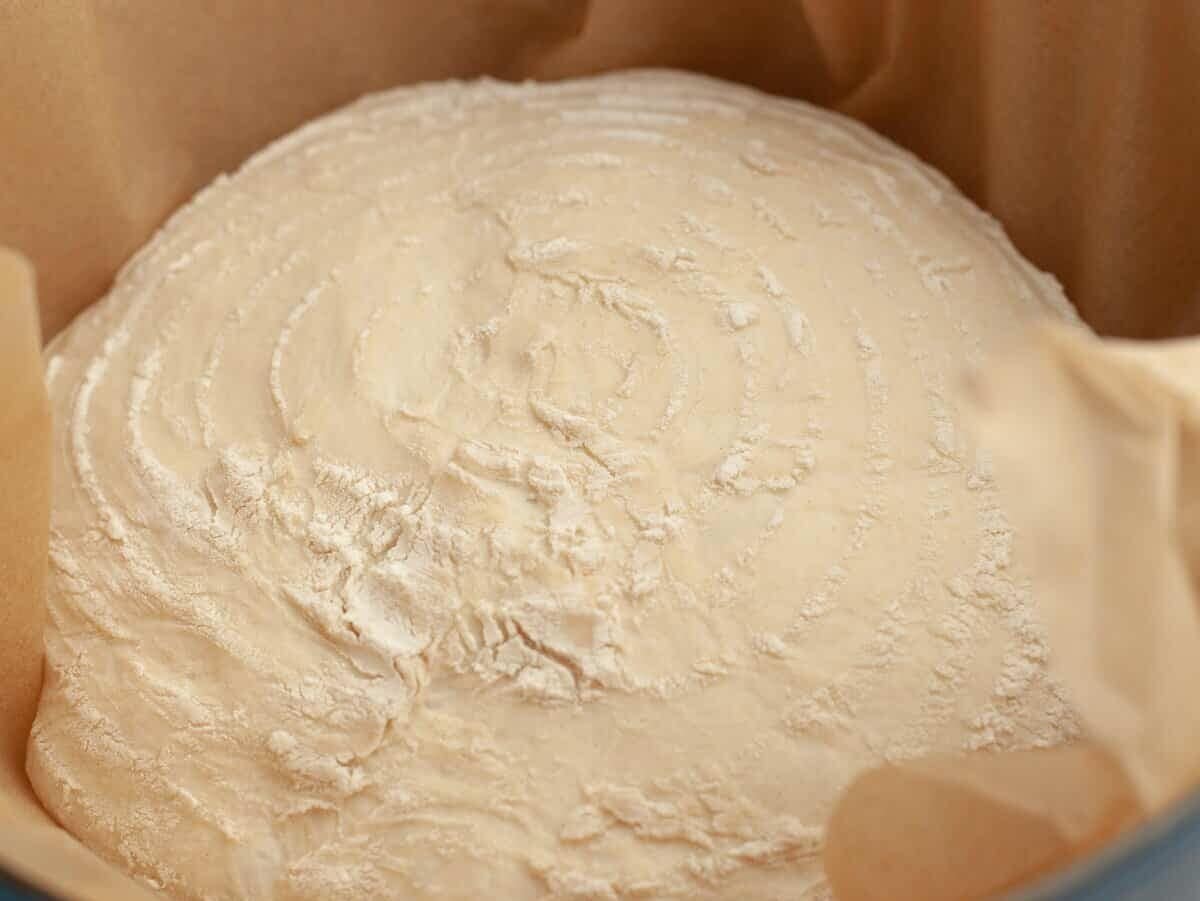
Step 6: Pull the loaf down the countertop to make a tight loaf. Place the shaped loaf in a proofing basket.
Step 7: Preheat a dutch oven in the oven at 450F. Place the shaped loaf on parchment and then carefully lower into the dutch oven.
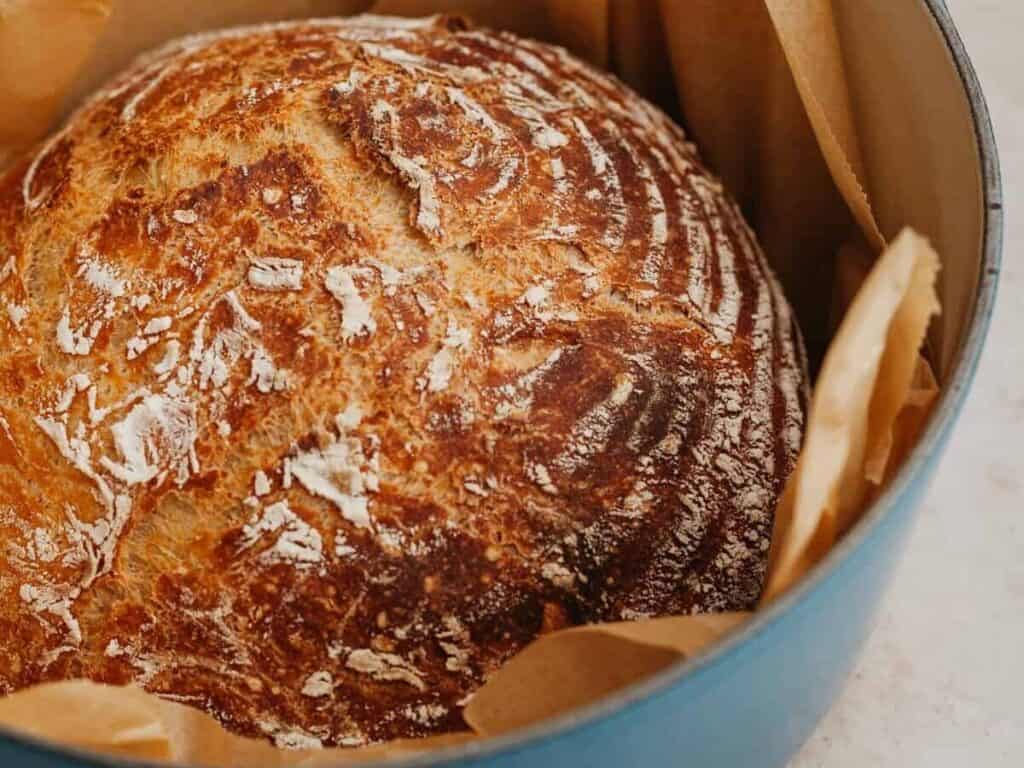
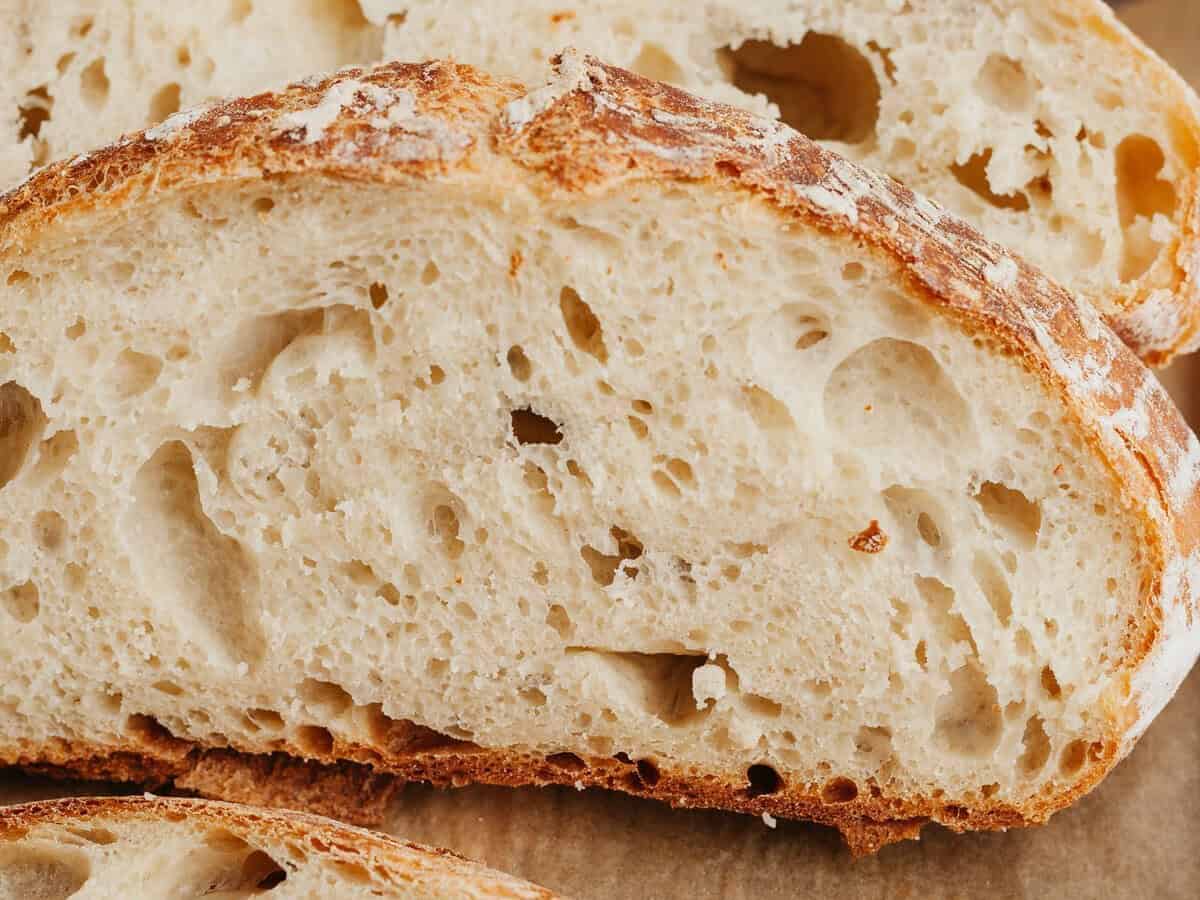
Step 8: Bake covered at 450F for 30 minutes. Take off the lid and continue baking at 450F for another 20 minutes. Allow to cool completely before cutting into slices.
Mad’s Expert Tips for the Best Overnight Bread 🍞
- Use a scale to measure – the best bread texture comes from exact measurements and timing. Measuring cups can have too many variables especially for dry ingredients. For a proper crumb, be sure to measure ingredients by grams.
- Perform stretch and folds as instructed – this is not a no knead bread recipe. For the yeast to activate and the gluten strands to form, it is important to knead the dough and perform the stretch and folds.
- Proof the bread in the fridge overnight – the slow fermentation is key for this recipe. The amount of yeast used is carefully timed for an overnight proof of 12-18 hours. If you want to proof the bread faster, either add more yeast or perform the long proof at room temperture instead of in a refrigerator.
I like to use this bread to dip into homemade soups and stews like this greek lemon chicken soup, chicken stew and classic vegetable soup.
Storage and reheating
If you want to keep the outside of the loaf crisp before slicing into it, keep the bread in a brown paper bag on the counter for up to one full day. Once you slice into the loaf I recommend storing it in an airtight container on the counter for up to 3 days.
I like to store my sliced bread in an airtight container in the fridge because I find it will stay fresh for up to one full week that way. I like to reheat it one slice at a time in the toaster.
It is also delicious as croutons. I cut the bread into bite sized pieces, spray with oil, sprinkle with salt and air fryer at 400F for just 4 minutes. They are the perfect topping for any salad!
Check Out these Other Bread Recipes


Images by Ella from Alpine Ella.

You can find the full recipe below. If you make this recipe, please rate and review it in the comments, or share it with me on Instagram!

Email Recipe for Later
Recipe
Overnight Bread Recipe
Ingredients
- 500 g of all purpose or bread flour
- 390 g of water at 90-95 degrees F
- 12 g kosher salt
- ⅛ tsp active dry yeast
- More flour for dusting surfaces
Instructions
- Prepare dough 15 hours before you are ready to bake your loaf of bread. If you want your loaf to go into the oven at 7am, start this process at 5pm the day before.
- Mix 500g of flour and 390g of 90-95 degree water in a large mixing bowl with clean hands. Continue mixing until all of the dry flour is incorporated into the water. It is okay if this mixture contains lumps. Cover the bowl with a clean towel and allow it to sit for 20 minutes.
- After 20 minutes, sprinkle the salt and yeast in an even layer over top of the dough. Using a wet hand, grab the sides of the dough and fold it over itself in pieces like you are hiding the salt and yeast into the center.
- Then, use your fingers to pinch the dough all around, this will help incorporate the yeast and salt into the dough. Alternate pinching and mixing dough with your hands until you feel the the salt and yeast are thoroughly incorporated – this will take 2-3 minutes. Cover the bowl again and allow to sit for 30 minutes.
- Over the next hour and half you will perform 3 stretch and folds on the dough in 30 mintue increments. 30 minutes after the salt and yeast are mixed in take off the dish towel, grab one side of the dough, pull up and stretch over the rest of the dough. Continue around the bowl stretching up a section the dough and folding it over the top of the rest of the dough until you have gone all around the bowl. Allow the dough to rest for 1 minute, then repeat the stretch and fold process.
- Cover the bowl, wait 30 minutes and repeat the stretch and fold process. Cover the bowl again, wait 30 minutes and repeat the stretch and fold process. Once you have performed 3 stretch and fold sets, cover the bowl with plastic wrap and allow to proof at room temperature for 12 hours – ideally overnight.
- When you are ready to shape your loaf, dust a clean work surface with flour and liberally dust a proofing basket with flour. Slowly turn the dough out onto the work surface and shape into a ball by puling the dough over itself and pinching it at the top so you have a relatively round ball with a seam and the top.
- Flip the dough ball over onto an unfloured part of your work surface so that the seam side is down. Pull the dough ball down the work surface rotating slightly as you pull it down towards you. This should help the dough form a tighter ball.
- Place dough ball in the proofing basket with seam side down and smooth side up. Allow the dough ball to proof for one hour.
- After the dough has been proofing for 15 minutes, place a dutch oven with a lid into the oven and preheat the oven to 450F – the dutch oven needs to warm for 45 minutes for the bread to bake properly.
- After the dough has been proofing for 1 hour, turn the dough ball out onto a piece of parchment paper with the seam side facing up. Carefully pull the dutch oven out of the oven and carefully lower the dough ball on the parchment paper into the dutch oven.
- Cover the dutch oven and return to the oven to bake at 450F for 30 minutes. After 30 minutes, take the lid off of the dutch oven and bake for another 20 minutes.
- Remove the dutch oven from the oven and then the loaf of bread from the dutch oven. Allow the loaf to cool completely before cutting into slices.
Recipe Notes
- if your home is warmer than 75 degrees F, the proofing process will happen much faster. You want the dough to double in size. This may happen as quickly as 8 hours instead of 12. If your home is very warm, the dough may be ready to bake just 30-45 minutes after shaping into a loaf instead of waiting the full hour.
- This recipe is based on the overnight white bread recipe from the book Flour Water Salt Yeast
Nutrition Information
This website provides approximate nutrition information for convenience and as a courtesy only. Nutrition data is gathered primarily from the USDA Food Composition Database, whenever available, or otherwise other online calculators.


Leave a Reply