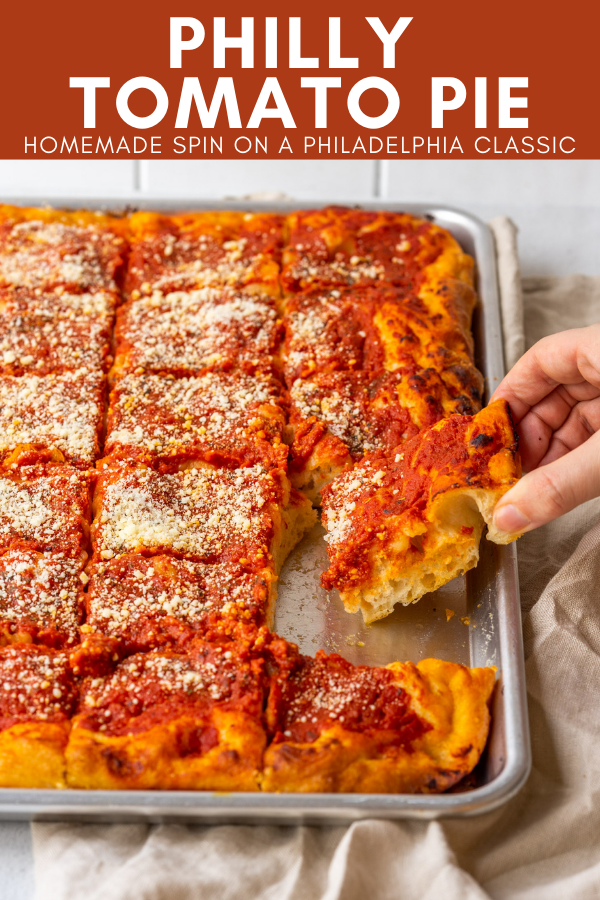
Philly Tomato Pie
Posted: 12/13/2020Updated: 01/02/2024
This post may contain affiliate links. Please read my disclosure policy.
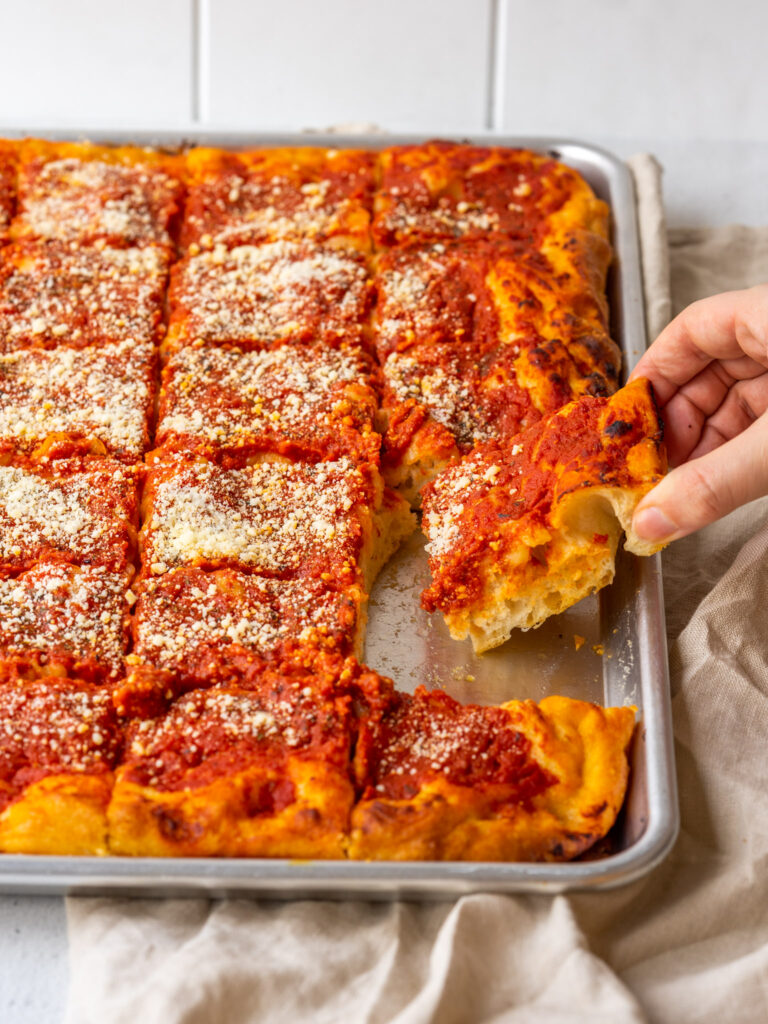
Make Philly Tomato Pie at home with this simplified recipe. This Philadelphia classic is made with bread dough, pizza sauce, and grated parmesan.
Contents
hide
What is Philly tomato pie?
Philly tomato pie is a Philadelphia classic made with bread dough, a thick pizza sauce and topped with grated parmesan cheese. It is made without mozzarella cheese and is usually served chilled or at room temperature.
If you didn’t grow up with tomato pie this might seem SO odd, like, why not just have normal pizza? In my experience we had tomato pie at different times.
My family serves tomato pie as a part of an appetizer spread or as a snack.
Where was tomato pie invented?
Okay so I’m calling this a Philly tomato pie recipe BUT where did tomato pie actually come from? I guess if you want to be technical about it you could say it came from Italy, but tomato pie as we know it in the United States came from Philly.
Tomato pie fist appeared in the United States in Philly in 1910 when Iannelli’s Famous Brick Oven Bakery opened. Since then Philly tomato pie has spread to bakeries and pizza shops all over the city and surrounding suburbs.
Other names for tomato pie
Philadelphians have all kinds of names for tomato pie. If you grew up in Philly, but no longer live there or have Philadelphian relatives, they might call it gravy pie, church pie, red pizza, granny pie or red pie.
What kitchen tools will I need to make some church pie at home?
- Scale for weighing ingredients
- Large bucket or bowl for mixing and proofing dough – I use a 12qt bucket
- Sauce pan for preparing pizza sauce
- Immersion blender to blend pizza sauce
- 13×18 sheet pan with small lip for baking your tomato pie
Why should I measure ingredients by weight for this tomato pie pizza?
Measuring ingredients by weight is far more precise than measuring by size. This is especially crucial when working with bread dough.
Then more precise your measurements, the better your tomato pie crust will be. If you don’t have a scale to measure, you can use this handy chart to convert to measuring by size.
What ingredients will I need to make this Philly tomato pie?
The ingredients for tomato pie are simple. Just like bread, you only need flour, water, salt and yeast to prepare the fluffy crust.
- Flour – I used King Arthur’s All Purpose Flour
- Water – Your water should be warm not hot
- Salt – Salt quality matters! I like Redmond’s Real Salt
- Yeast – I use instant yeast, but you can use active dry or instant
- Whole peeled tomatoes – Look for the DOP logo on the can for the best tomatoes
- Olive Oil – For the sauce + extra for crust
- Garlic – minced and mixed into the sauce
- Oregano – optional
- Grated parmesan cheese – also optional
Active Dry Yeast vs. Instant Yeast
You can use either active dry yeast or instant yeast in this recipe. Active dry yeast needs to bloom in water before it is used and instant yeast can be mixed in with dry ingredients.
For this Philly tomato pie recipe we will be blooming the yeast in water anyway so you can use either type of yeast!
Let’s make a Philly Tomato Pie!
Step 1: Prepare the bread dough and proof
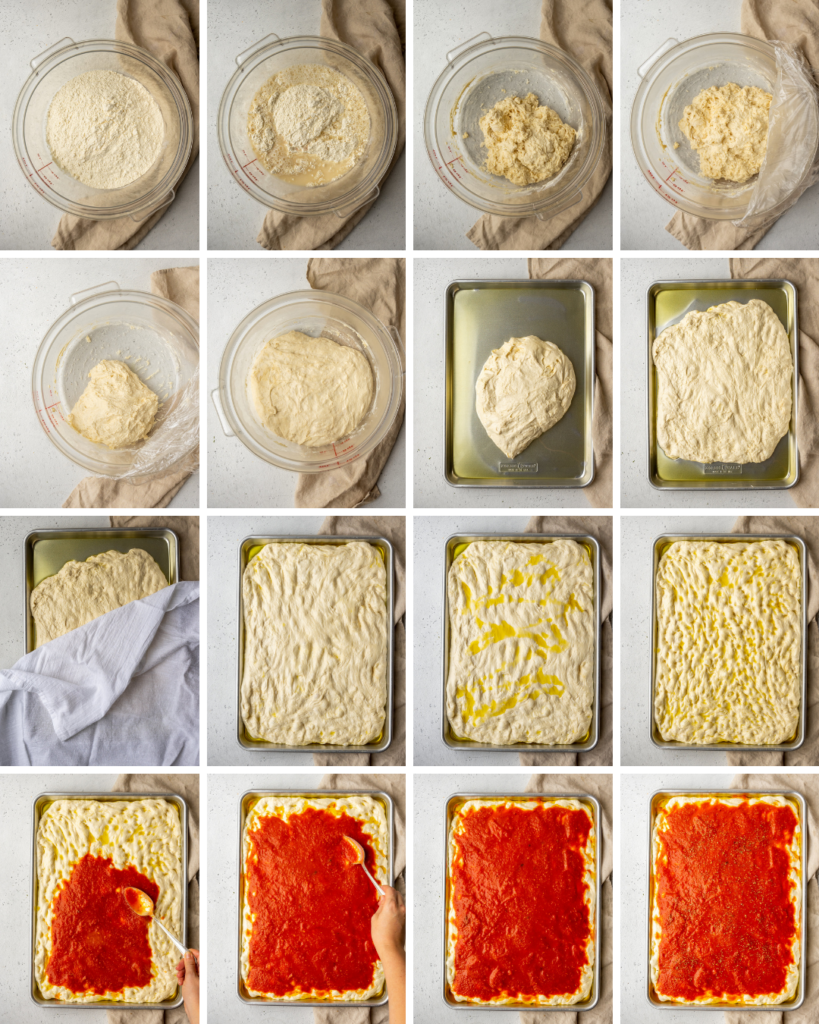
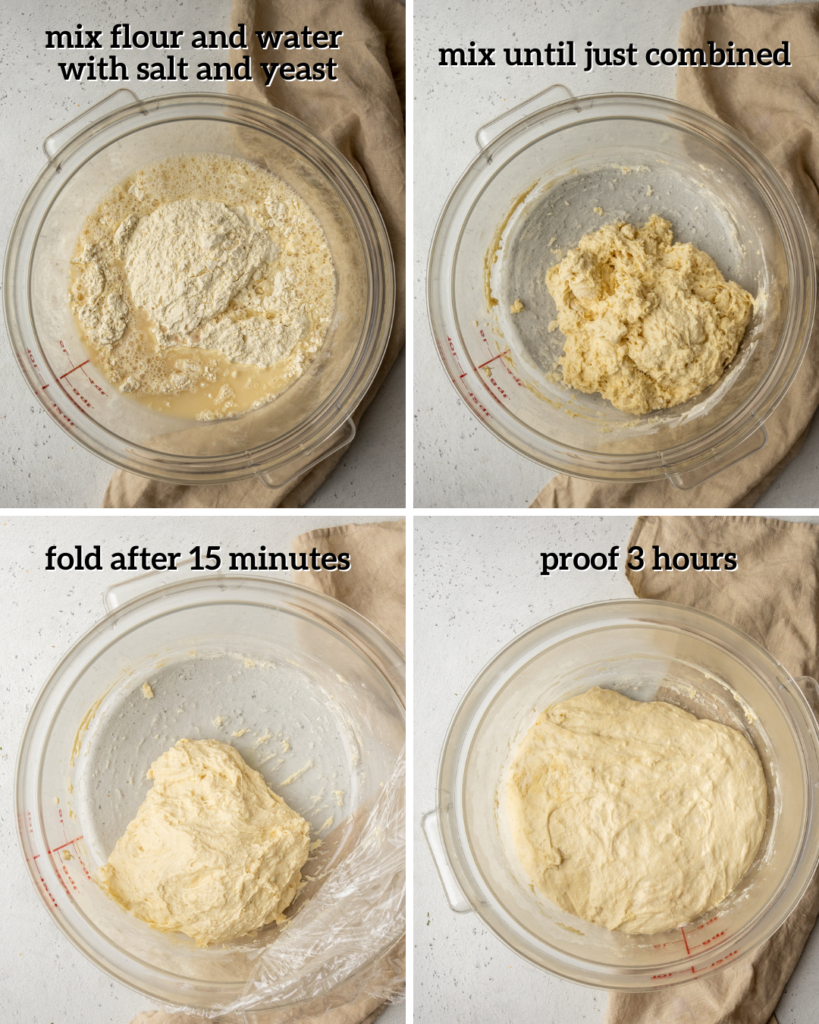
To begin, measure water and flour. Bloom yeast in water. Then, mix water and yeast with flour to create a shaggy mixture.
After 15 minutes you will fold the dough twice. Then, cover the bowl or bucket with plastic wrap and leave the dough to proof for 3 hours.
Step 2: Prepare the pizza sauce
While the dough proofs prepare the sauce by adding the whole peeled tomatoes, olive oil, salt, and minced garlic to a sauce pan, use an immersion blender to blend the sauce.
Gently simmer the pizza sauce for 45 minutes. Remove the sauce from the heat to cool
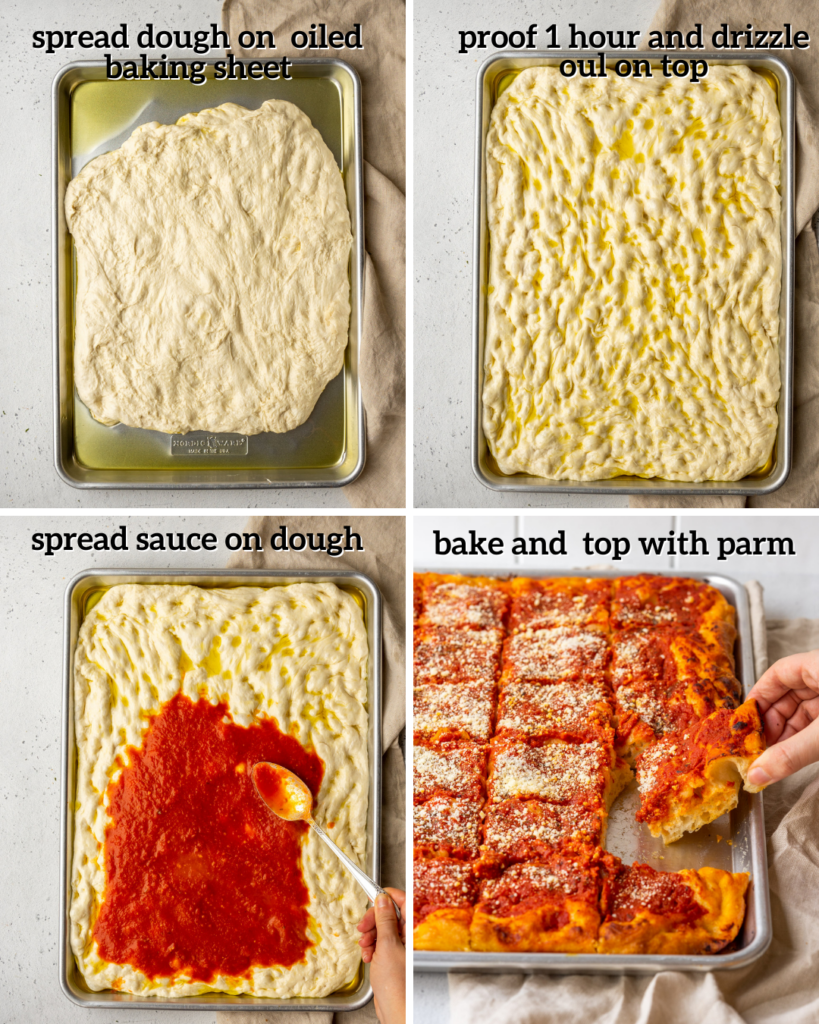
Step 3: Spread sauce over proofed dough and bake!
After the dough has proofed for 3 hours, spread olive oil onto a sheet pan with your hand. Spread the dough out as best you can. Then, cover the dough on the sheet pan with a clean dish cloth and allow to proof for another hour.
Preheat your oven to 475F. Drizzle a generous amount of olive oil on top and spread it with your finger tips. Make small divots in the dough with your finger tips.
Then, spread a thick layer of the sauce you prepared earlier over the top of the dough. Place in the oven to bake at 475F for 30 minutes.
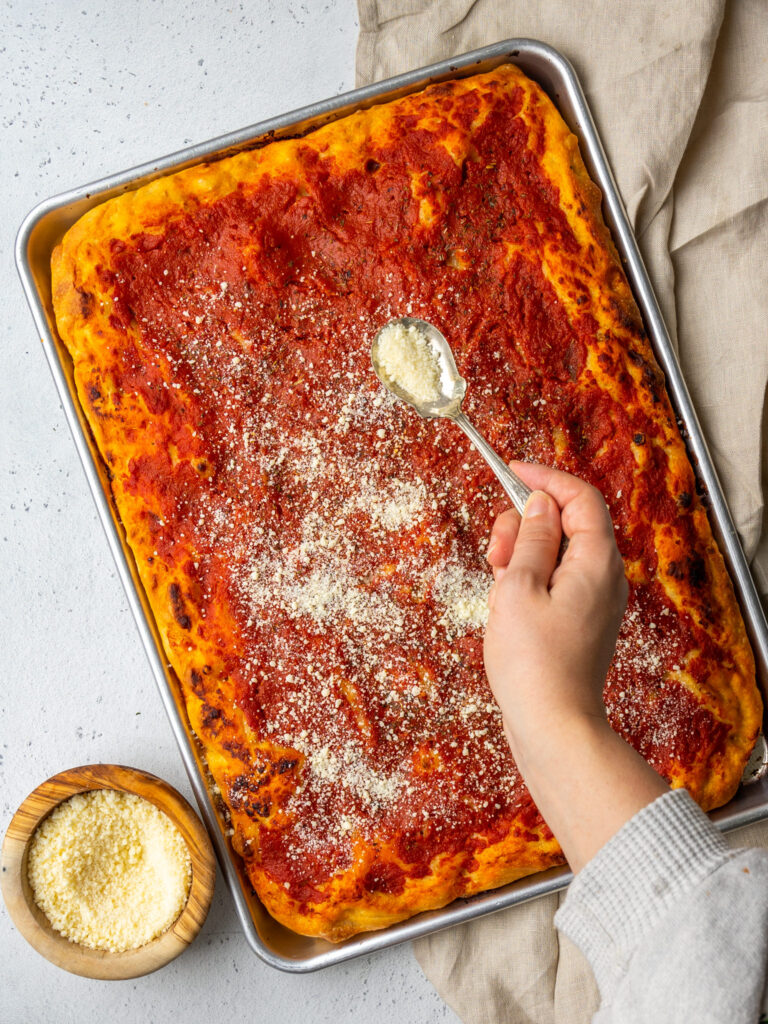
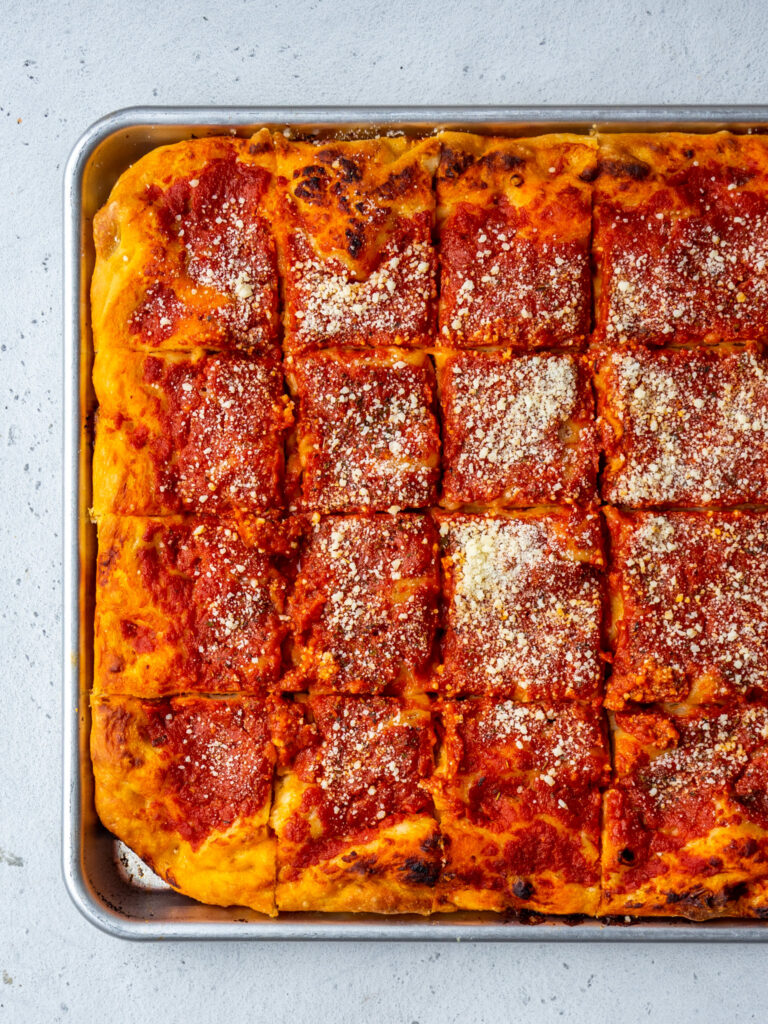
Finally, remove the tomato pie from the oven and allow to cool completely before topping with a generous shake of grated parmesan.
Step 4: Enjoy!
How should I store my tomato pie?
You can leave the tomato pie on the sheet pan that you baked it on and cover it with some tin foil. Then, place the tomato pie in the fridge for up to 1 week.
You can also freeze this Philly tomato pie. Wrap it tightly in plastic wrap and then in tin foil. Freeze for up to 3 months. Allow the tomato pie to thaw in the fridge before enjoying.
If you’re looking for an easier way to curb your pizza craving, try this simple tortilla pizza.
You can find the full recipe below. If you make this recipe, please rate and review it in the comments, or share it with me on Instagram!
Recipe
Philly Tomato Pie
Philly tomato pie made with bread dough, pizza sauce and grated parmesan
Prep: 4 hoursCook: 30 minutesTotal: 4 hours 30 minutes
Servings: 16 servings 1x
Ingredients
Crust Dough
- 750g flour
- 540g warm water
- 3/4 tsp yeast
- 3/4 tbsp salt
Pizza Sauce
- 2 cans whole peeled tomatoes (28oz each)
- 2 tsp salt
- 1/4 cup olive oil
- 4 cloves garlic minced
Instructions
- Measuring water and flour on a scale and place flour in a large bowl or bucket. Mix salt in with the flour. Add yeast to warm water and allow to bloom for 5 minutes. Pour water and yeast mixture into the flour and mix with your hand until all of the dry flour is just mixed in. This is called a shaggy mix and should not be a smooth mixture.
- Cover with a damp towel and rest for 15 minutes. After 15 minutes you will fold the dough three times (or until it is mostly smooth). Wet your hand, reach into the bucket or bowl and reach under the dough at one corner. Pull and stretch the dough over to the top. Repeat with all four corners of the dough. Then flip the dough upside down so the folds are at the bottom. Wait one minute then repeat this process again. At this point your dough should be smoother and stretchy. Cover the bowl or bucket with plastic wrap and leave the dough to proof for 3 hours.
- While the dough proofs prepare the sauce by adding the whole peeled tomatoes, olive oil, salt, and minced garlic to a sauce pan, use an immersion blender to blend the sauce. It does not have to be perfectly smooth. Increase the heat to medium-high and wait for it to begin to simmer. Once it simmers reduce the heat to medium-low or low and continue with a low simmer with the pot uncovered for 45 minutes. Remove the sauce from the heat to cool
- After the dough has proofed for 3 hours, spread olive oil onto a sheet pan with your hand. Using your oiled hand, grab the dough from the bowl or bucket and place on the sheet pan. Spread the dough out as best you can. It’s okay if the dough shrinks back without reaching the corners of the pan. Cover the dough on the sheet pan with a clean dish cloth and allow to proof for another hour.
- When that hour is almost up, preheat your oven to 475F. Remove the dish cloth from the dough and once again spread it over the sheet pan, this time it should be easier to stretch the dough. Drizzle a generous amount of olive oil on top and spread it with your finger tips. Make small divots in the dough with your finger tips, but do not pierce the dough. This prevents large bubbles from forming.
- Spread a thick layer of the sauce you prepared earlier over the top of the dough, you will not use all of the sauce, but do not be afraid to use A LOT of it. You want a nice thick layer. Sprinkle oregano over the top. Place in the oven to bake at 475F for 30 minutes. Remove the tomato pie from the oven and allow to cool completely before topping with a generous shake of grated parmesan.
Notes
***use the images in the blog post for help with the dough
****use a 13×18 sheet pan with small lip for baking the pie
This website provides approximate nutrition information for convenience and as a courtesy only. Nutrition data is gathered primarily from the USDA Food Composition Database, whenever available, or otherwise other online calculators.


Bharat Shah says
You can take a girl out of Philly but you can’t tomato pie out of her favorites. Search everywhere in Dallas, Texas but no luck of Philly tomato pie. Baking is not my forte, but this recipe is super simple (aside from time) to follow and pie came out perfect to texture and taste. I nailed it thanks to your precise recipe. So good…
Madeline says
hahah amazing!! so so glad this could be a resource
Kathryn says
Doesn’t adding the salt at same time as yeast kill the yeast? I’m definitely not a baker but I had heard that before. And you just mix by hand not a stand mixer?
Madeline says
Sorry im not a trained baker, but I have no issues. I mix by hand but you can use a dough hook on a stand mixer
Kim says
Just had tomato pie last weekend from a very famous Italian bakery which I won’t name but tried this recipe today much to the super nay sayers in the family that nothing is better than this bakery’s pie. Well none of them are saying a word and the reason is their mouths are too busy eating the finished tomato pie. Used San Marzano whole tomatoes and took sauce to the edges and all I can say is I don’t need to buy tomato pie anymore. This is better. The texture of the crust is what stands out. A lot of tomato pies are denser and not crunchy but more chewy. This has great texture that I prefer. Thank you!
Madeline says
that makes me so happy! thanks so much Kim! I’m so glad everyone loved it 🙂
Peter says
I will be making this for a 2nd time and was thinking of letting the dough proof overnight to allow it more time to develop flavor and more airy crust. Does it make a diffy for this type of pizza ( tomato pie) LoL. Thanks! It did come out great my time time around but always looking to improve.
Madeline says
overnight at room temp is likely too long BUT you could definitely let it proof for a bit at room temp then pop in the fridge overnight
Lildee says
Looks delicious! Do you cook at 475 or 457?
Madeline says
475F !! Thank you for catching my typo. Just updated it
Brittney says
Love this!!! So delicious but also so easy to make and very convenient to make ahead. Love that the sauce recipe makes enough to freeze some for later. I’ll make another this week with the extra sauce. With a salad, this fed 4 adults and 2 small kids with a few extra pieces! Amazing. Thank you!!
Madeline says
aww love to hear it! thank you! yes we love the extra sauce for pizzas or pasta
Brittiny says
Turned out great! I made for my boyfriend’s lunches one week as something different since he had grown up with something similar from the local deli! It was a big hit! I usually prefer less tomato sauce and more cheese on my pizza but when it came out of the oven I couldn’t resist, I ate an entire piece as a “snack”.
Madeline says
ahh yay! so glad you liked it!
Ed jazdzewski says
Can you post these ingredient weights and measurements to lbs. for a philly guy that knows nothing about grams
Madeline says
Hope this helps!
750g flour = about 6 cups
540g warm water = 2 and 1/4 cups of water
Monique says
Hi. Do you drain the tomatoes? The sauce seems thin. Maybe it just needs to reduce more?
Madeline says
Hi there, I did not drain them so it might just need to reduce more to become thicker! 🙂
Michele says
Great recipe! It’s worth the time and effort.
Madeline says
Thanks, Michele!
Chantal’s says
I made this pizza and I followed the recipe exactly as is and I must have gone wrong somewhere with the sauce. Was it suppose to be thick? Mine was very watery. We are Italian and I make this kind of pizza often but I wanted to make a change and try something different. The sauce is usually thicker with more chunks of tomatoes. Maybe in the US it’s different? We also just call it tomato pizza here and in Italy where both sides of our families are from. Nonetheless it was still good but I thought maybe it was me that might have missed the sauce.
Madeline says
Hi! Sorry that happened. Mine is quite thick, but no chunks because I choose to puree it. It is likely the style of canned tomato that you purchased. If you want to make this again in the future you can drain some liquid from the tomatoes and then cooke the sauce OR prepare a sauce any way you like and it will work just follow the instructions and skip the sauce prep step!
Mike Sr. says
This pie looks Amazing! Would mind telling me what size the sheet pan is that you made it on. I’m asuming it’s a half sheet? Thanks.
Madeline says
Yes, half sheet! Thanks, Mike!
Deb says
can you tell me in cups how much flour and water, thank you looks delicious!!
Madeline says
Hi for this recipe it is important to measure ingredients by weight because it is more precise than measuring by size. This is especially crucial when working with bread dough.
Patty says
Mine is in the oven as we speak! I’m so excited to taste it! The recipe was so easy to follow and the sauce is delicious! Wondering if you could make batches of dough ahead of time then freeze after the 3 hour proof then thaw and proof for the additional hour and bake? I’m not a baker at all but this would be so easy and convenient!
Madeline says
Hi there! I haven’t tried that but I think it should work. I would recommend thawing under refrigeration and then proof.
Mike says
Well done with this recipe! Philly area native so I can vouch for this.
Only “change” I’d make is to use all the sauce. Of course it depends on how much you cook it down but I followed the times here and used it all. I used 2/3 to 3/4 of the sauce and cooked it for 7:30. I then took it out, added the remaining sauce, and put it back in for another 7:30 without rotating it. After 15 total minutes I rotated it and then finished the bake as directed (15ish minutes). The crust comes out very crispy and I was worried it was over done for a firm but chewy crust (more on that below). I cut mine with a bench scraper before putting it in the fridge. After it cooled I topped it with freshly grated Parm and popped it in the fridge overnight. Make sure you tent the foil by breaking toothpicks in half so that they stick up in the dough and keep the tin foil off the sauce.
Took it out 30 minutes before it was going to be served so that the chill would be off of it and it could come to room temperature. Crust was *perfect* after sitting in the fridge overnight. It was sturdy but chewy without being crispy at all. The sauce soaked into the upper layer of dough giving it that spongy texture while the dough underneath was the perfect tenderness.
Everyone loved it and was surprised I’d never made it before. This has been bookmarked and I’m definitely making it for the next party I go to. Follow the directions as is and you’ll knock this one out of the park and everyone who cooks will be asking you for this recipe!
Madeline says
Thank you for such a thoughtful review, Mike! I am so glad everyone enjoyed it!!
Mike says
How do you think this would do as a Sicilian pizza? I’m thinking of par baking it, with or without the sauce, for 25 minutes and then popping it in the fridge until I’m ready to finish it. Then I’d top it with shredded mozzarella (and sauce if omitted during par baking) and put it back in the oven for 10-15 minutes. What do you think?